
Common Problems - Virtually ALL problems experienced with the SignaLink are addressed in this section. Please read thoroughly before calling for assistance.
Setting Audio Levels - You MUST set your sound card audio levels or the SignaLink may not work properly. Please follow this detailed procedure if you have not already done so!
Sound Card Test - If you've gone through our troubleshooting tips and level setting procedure but are still having trouble, then follow this procedure to verify that your sound card is actually working.
These are the most common problems reported to our Technical Support Staff. If you cannot resolve your problem, or if you do not find your problem listed here, then please contact our Technical Support Staff for assistance.
Radio won't transmit (SignaLink's PTT indicator is OFF) - It is important to remember that the SignaLink keys the radio automatically when it detects transmit audio from the sound card's Speaker/Line output jack. If the PTT light on the SignaLink is OFF, then it is most likely because the sound card PLAYBACK volume controls are set too low, or the cabling between the SignaLink and the sound card is incorrect. Verify/check the following:
Sound card levels set
too low – This is the most common cause of Transmit problems. If
you have not already followed our sound
card level setting procedure, then please click here
to do so.
Sound card cables
reversed – Make sure you have not reversed the mic/spkr cables to the
sound card and that they are plugged into the correct sound card jacks.
If your sound card's jacks are color-coded, then the Mic input jack
will be Pink or Red, and the Speaker output jack will be Green. If the
jacks are not color-coded, then you should refer to your
computer’s manual to verify the correct jack location.
Sound card not
functioning properly - If your sound card is working,
then you should be able to insert a pair of headphones or speakers into
your sound cards Speaker output jack, and hear the Transmit audio signal
(modulation). If you cannot hear the signal, or if you are not sure
that your sound card is
functioning, then you should test your sound card using our Sound
Card Test Procedure.
Radio
won't transmit (SignaLink's PTT indicator is ON) - If
the SignaLink's PTT light comes on but the radio doesn't transmit, then you have
jumpered the PTT and/or Ground pin incorrectly on JP-1.
This
should not be an issue if you tested the PTT line as outlined in the jumper
section. If you find ANY jumper connected wrong then we recommend that
you go through the entire jumper installation procedure again.
Radio Transmits But Power Output Is Too Low – The RF power output of your radio is determined primarily by the amount of sound card speaker audio that reaches the radio. If your radio isn't putting out enough power, then more than likely, you just need to raise the sound card's PLAYBACK "Master" and/or "Wave" volume controls, and/or the SignaLink's internal "TX Level" control (SL-1+ only). However, there are other controls that also effect the power output, so we strongly suggest that you follow our Audio Level Setting Procedure if you haven't already done so. If you have already been through this procedure, then we suggest that you repeat it, paying careful attention to the final step involving setting the transmit power level. If you are still unable to reach the desired power level, then please contact our Technical Support Staff for assistance.
Radio "flutters" between transmit and receive - This is caused by an incorrect software volume control setting on your computer. It happens when Receive Audio from the radio enters the sound card's mic or line input and is fed back out the sound card's speaker output. To fix this problem, you need to open the PLAYBACK volume control panel and MUTE the "Microphone" and "Line In" volume control. Be sure to disable the Mic/Line In control under PLAYBACK only (NOT Recording!) or you will not be able to receive!
My
transmit signal is wide or distorted - This is generally the result of
over-driving your radio, but there are other causes. Your radio's speech
processor/compressor should be OFF.
Your
sound card's “Bass Boost” or “Audio
Expander” features should also be OFF. Verify
that
your radio's "RF Power" or "Forward Power" control
knob (or menu item) is set to provide maximum RF power, and then try adjusting
your audio levels again using our
Audio
Level Setting Procedure.
If
you are unable to correct the problem, then please contact our Technical
Support Staff for assistance.
I can't seem to receive - There are several possible causes for this problem:
Sound card not
functioning properly - If you are not sure if your sound card is
functioning, you should see the Sound
Card Test Procedure.
Sound card or radio
level controls set too low or muted - Because there are multiple
controls that effect
audio
levels, it is very easy to have one set wrong.
See the "Detailed
Procedure To Set Audio Levels" to correct the problem.
Sound card cables
reversed – Make sure you have not reversed the mic/spkr cables to the
sound card and that they are plugged into the correct sound card jacks.
If your sound card's jacks are color-coded, then the Mic input jack
will be Pink or Red, and the Speaker output jack will be Green. If the
jacks are not color-coded, then you should refer to your
computer’s manual to verify the correct jack location.
Computer too slow or incompatible with software. Software not configured properly - Check the documentation for the program that you are using and verify that your computer meets the minimum requirements. Verify that the program is configured correctly, and be sure that you are using it correctly. You should not be running more than one communication program at a time, and any un-used programs should be closed. If all else fails, test using a different program.
Why
Can't I Receive Some Stations - No matter how good your antenna and
radio are, there will always be some stations that you cannot copy (even with
strong signals!). While the reason for this may be because of operator error
(wrong mode or baud rate, off frequency, etc.), radio wave propagation problems
can often prevent you from receiving.
Some
modes are more susceptible to this than others.
For example, even though PSK31 usually works very well with weak signals,
sometimes even strong PSK31 signals cannot be copied at all because of multipath
and Doppler Shift propagation problems.
Other
modes like HF Packet and RTTY do not work well with weak signals and are
susceptible to multipath and Doppler Shift.
Windows
"System Sounds" Cause The SignaLink To Transmit – Since the SignaLink is activated by sound card
output, it is important that it is turned OFF when not in use. The sounds that are generated by Windows during different
system events (Startup, Shutdown, File Close, etc.) can be transmitted if they
are inadvertently sent to the SignaLink.
If you are having unexplainable problems or are simply not sure if your sound card is working at all, you can use the following test procedure to verify sound card operation. This test uses the Sound Recorder program that comes with Windows to test your sound card’s record and playback functions. Before you begin the test, you need to verify that your computer speakers are plugged into the sound card and that all programs that use the sound card are closed.
To test the record function of the sound
card, we need to have an audio source connected to the sound card's Microphone
input.
We will use your radios
external speaker output for this purpose.
Disconnect
ALL CABLES from the
SignaLink before you start this test.
Using a stereo cable, connect the Speaker or
Headphone output of your radio to the “SPKR” jack on the rear of the
SignaLink.
Be sure to use the
jack that’s labeled “SPKR” (not the one labeled “Computer -
SPKR”).
Using another stereo cable, connect the
SignaLink’s “Computer - MIC” jack to your sound card’s Microphone
input jack (not the Line Input).
Make
sure no other cables are connected.
Before we can record a signal, we need to adjust the radio and computer volume controls. Please note that the volume settings used here are for test purposes only. The controls will need to be re-adjusted later using the “Detailed Procedure To Set Audio Levels”. For now, adjust the audio level controls as follows:
Set
your radio's volume control to half of full volume.
Run the Windows Volume Control program by clicking on the Start Button and selecting Programs, Accessories, Multimedia (or Entertainment) and then Volume Control. The Volume Control panel should look similar to the one shown below:
Figure 1 – Volume Control Panel
From
the Options menu, select Properties to display the Properties page. In
the “Adjust Volume For” window, select Playback.
In
the “Show the following volume controls” window, verify that the Master
Volume and Wave controls are selected.
The Properties Page should look like the one shown in Figure-2. Note that the Master Volume control may be labeled “Volume
Control”.
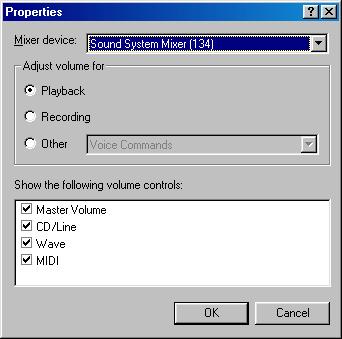
Figure 2 – Sample Properties Page
Click
OK to close the properties page.
The
Playback volume controls should now be displayed.
Set
the Master Volume and Wave controls to 1/2 of full volume.
Verify that the Master Volume and Wave Level controls are NOT muted.
The Balance controls should be left in their center position.
From
the Options menu, select Properties to display the Properties page. In the “Adjust Volume For” window, select Recording.
In the “Show the following volume controls” window, verify that the Microphone box is checked. When you are done, the Properties Page should look similar to the one shown below.
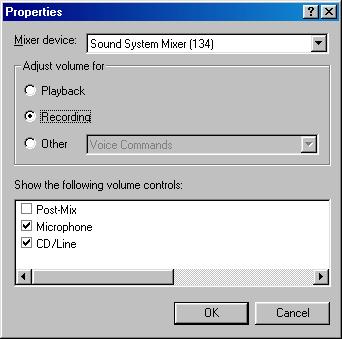
Figure 3 – Record Properties
Click OK to close the properties page.
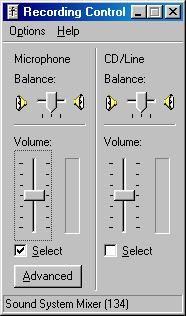
Figure 4 - Record Level Controls
Set
the Sound Card’s Master Volume and Microphone Level controls to mid range.
Verify that these controls are selected by the Select check box below each
control. If only one level control can be selected at a time, then
select the Microphone input. NOTE: The Master Volume control
may not be shown.
Click on the X in the upper right-hand corner to close the Volume Control. Your new settings will be saved automatically.
Now that the recording and playback controls are set to a usable level, we are ready to record and playback a test sound.
Start the Sound Recorder program by clicking on the Start Button and selecting Programs, Accessories, Multimedia (or Entertainment) and then Sound Recorder. The Sound Recorder program should look like the picture below. Note the location of the Record, Stop and Play buttons.
Figure 5
– Sound Recorder Screen Shot
To
begin recording, click the Record button.
If everything is working correctly, you will see the position slider
moving from left to right and the Position display incrementing. You
should also see the scope display in the center of the program window track
the audio signal. If nothing happens, or if you get an error message,
then see the "Sound Card Problems"
section below.
If
everything appears to be working, then let the program record for a few
seconds and then click the Stop button. We now have a test sound
recorded that we can play back through the speakers.
To
play the sound, click the Play button.
You should hear the sound through your computer speakers. If
you do, then you can close the Sound Recorder program.
Your sound card is functioning correctly.
If you don’t hear the sound playback, then you need to proceed to
the "Sound Card Problems"
section.
While Tigertronics does
NOT provide support for sound card problems, we have listed a few
troubleshooting tips here to help you with some of the most common
problems. If you are unable to resolve a problem with your sound card,
then
you will need to contact your computer’s manufacturer or a computer repair
shop for help.
If the record and playback features of the
Sound Recorder program seem to work, but no sound is ever heard (or seen on
the scope display), then check the level controls. You might have one
of the volume controls muted, de-selected or set too low. If the
volume controls look ok, then check your cabling. Verify that the
cables have the right type of connector installed (3.5mm stereo) and are
plugged into the right jacks.
If you receive an error message when you click
the Record or Play button, then you need to verify that all other programs
that use the sound card are closed. Problems can occur if more than
one program tries to access the sound card at one time.
If all of the other sound card programs are closed and you still
receive an error message when you click the Record or Play button, then your
sound card or its drivers may not be installed correctly. Refer to the
instructions that came with your sound card (or computer) to re-install the
card and / or drivers.
If all of the Sound Recorder control buttons
(Record, Play, etc.) are disabled, then your sound card drivers are probably
not installed correctly. Refer to the instructions that came with your
sound card (or computer) to re-install the card and /or drivers. Note
that it is normal for the Play, Rewind and Fast Forward buttons to be
disabled until after you have recorded a sound.
This is a “Step-By-Step” procedure to
assist those who are not already familiar with setting sound card levels using
the Windows Volume Control Panel.
Before
you operate your SignaLink on the air, you will need to adjust the Receive and
Transmit Audio levels.
Incorrect
adjustment of these levels can cause poor reception, over-modulation, or
improper operation.
This procedure
will show you how to adjust your sound card and radio audio levels for optimum
performance.
Before you can adjust the audio levels, the
SignaLink must be connected to the sound card and radio. Both the
SignaLink and the radio should be powered ON and a communications program that
you have selected should already be installed on your computer. Note that
we will be using the communications program to generate the audio tones that are
used to adjust the level controls, so CW programs should NOT be used unless they
have a continuous "Tune" mode.
A
program like DigiPan is ideal.
NOTE: Be sure that your radio is connected
to an antenna or dummy load before proceeding! Once you have properly
adjusted all controls, your transmit power level should be NO HIGHER than that
recommended by the radio manufacturer for continuous duty cycle transmissions
(check your radio manual!). Do NOT transmit at a level higher than that
recommended by your radio manufacturer, or you might PERMANENTLY DAMAGE YOUR
RADIO!
Follow the steps below to set your transmit audio level.
Set your radio's "RF Power" or "Forward Power" control knob (or menu item) to provide maximum RF power output. Note that you will NOT be transmitting full power once all controls have been properly adjusted. This is only done in the beginning to insure that the radio responds to a low level of modulation without being over-driven.
Set your radio's Mic Gain control to 50%. Note that this control usually only effects the Mic connector, but it might also effect the Data or Accessory Port (check your radio manual). If this control does not effect the connector that the SignaLink is attached to, then you can ignore it.
If you have the SignaLink SL-1+ attached to your radio's Data or Accessory Port, then you should verify that your radio's input gain control (menu setting) is set to 50% (usually the factory default). Note that this feature is NOT available on every radio.
Set the SignaLinks Delay switch to the short delay position (the "Var" LED should be OFF on the SL-1+).
Start
the communication program and leave it in Receive mode.
Run the Windows Volume Control program by clicking on the Start Button and selecting Programs, Accessories, Multimedia (or Entertainment) and then Volume Control. The Volume Control panel should look similar to the one shown in Figure-6.
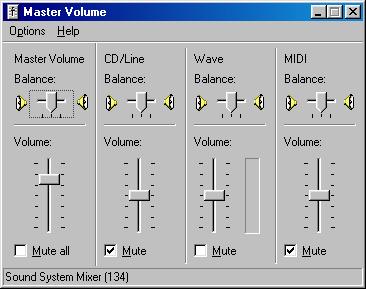
Figure 6
– Volume Control Panel
From
the Options menu, select Properties to display the Properties page. In
the “Adjust Volume For” window, select Playback.
In
the “Show the following volume controls” window, verify that the Master
Volume, Wave, Mic, and Line Input level controls are selected.
When you are done, the Properties Page should look similar to the one shown
in Figure-7 (note that not all of the "checked" controls can be
seen in the picture).
NOTE: The Master Volume control may be simply labeled “Volume
Control”.
Figure 7
– Playback Properties
Click
OK to close the Properties page.
Set
the sound card’s Master Volume control to approximately 75% of full
volume.
Set the sound card’s
Wave level control to minimum.
All
Balance controls should be left at their center position.
Verify
that the Master Volume and Wave level controls are NOT muted (check box).
Verify
that the Mic and Line Input controls ARE MUTED (check box). These
controls MUST be muted to prevent Receive Audio from being mixed and sent
back out the sound card speaker output.
Any other controls that you are not using can
also be muted to reduce the
amount of noise picked up by the sound card.
Verify
that all special audio processing features are turned OFF.
This includes features like “Bass Boost”, “Audio
Expander”, etc.
These
features must be turned OFF or they will distort your transmit audio.
Put
your communications program into transmit mode.
If the program has a “Tune” or “Adjust Transmit Drive” mode,
then select it.
The
SignaLink’s PTT light should be OFF at this point.
Now, slowly slide the sound card’s Wave level control up until the
PTT LED turns ON.
When the LED
turns ON, note the position of the slider and then increase its level by
about 50%. The sound card’s
volume levels are now properly set for reliable PTT operation. ** SEE
THE NEXT STEP TO SET YOUR RADIO'S TRANSMIT POWER LEVEL**.
At this point your radio's Transmit power level will most likely be LOWER than desired. However, on a few radios, you might find that you already have too much RF power. If this is the case with your radio, then skip down to the "RF Power Too High" section below. If your radio's power level needs to be higher, then see the "RF Power Too Low" section (next).
RF Power Too Low - If your radio's Transmit power level needs to be
higher, then you can increase it by adjusting one or more of the following
controls:
Sound card "Master" and/or "Wave" volume control
SignaLink's internal "TX Level" control (SL-1+ model only)
Radio "Mic Gain" knob, or Data/Accessory Port Gain control (usually a menu setting)
We suggest that you first try increasing the Transmit power level by setting
the sound card Master and/or Wave volume controls higher. If this does
not provide enough power, or if both controls must be set at maximum to get
the desired power level, then you should back off the sound card controls and adjust
the SignaLink's "TX Level" control for more power
(turn Clockwise). You should be able to adjust the TX Level control
for the desired power level. If not, then please contact our Technical
Support Staff for assistance.
NOTE:
Before you adjust the power level, you need to check your
radio manual and find out what the recommended maximum transmit level
and duty cycle are.
Most
digital modes CANNOT be run at full power without
damaging your radio.
RF Power Too High - With the sound card volume controls set just to
the point of providing reliable PTT activation, it is very unlikely that
your Transmit power level will be too high (**see note below). However, on some radios
with very sensitive inputs, this can happen. If this is the case with
your radio, then we suggest that you first repeat the level setting
procedure to be sure that it is done properly. If this does not
resolve the problem, then you can decrease the power level by doing one or
more of the following:
Turn down your radio's Mic, Data or Accessory Port Gain control (this may be a knob or menu item).
CAREFULLY turn the SignaLink's internal "TX Level" control down (counter-clockwise). The factory setting for this control is at minimum (fully counter-clockwise), so you won't be able to lower it unless you had previously turned it up.
Replace the SignaLink's Mic jumper wire with a resistor (1/4 watt size only!). This is RARELY necessary, but if needed, it will solve the problem. Please contact our Technical Support Staff for assistance in selecting the proper resistor value.
**NOTE: Once the Master and Wave volume controls have been set
to provide reliable PTT activation, you should NOT lower them to reduce the
power output of your radio. If you do, then the SignaLink may NOT transmit
reliably.
Follow the steps below to set your receive audio level.
Set
your radio’s volume control to about 25% of full volume.
If
it's not already running, start the Windows Volume Control program again by
clicking on the Start Button and selecting Programs, Accessories, Multimedia
(or Entertainment) and then Volume Control.
From
the Options menu, select Properties to display the Properties page. In the “Adjust Volume For” window, select Recording.
Figure 8
– Recording Properties
Click
OK to close the Properties window.
The
Volume Control panel should now show only the Recording controls. It
should look similar to the picture shown in Figure-9.
Figure 9
– Record Level Controls
Set
the sound card’s Master Volume and Microphone Level controls to mid range.
Verify that these controls are selected by the “Select” check box
below each control.
If only one
level control can be selected at a time, then select the Microphone input.
NOTE: The Master Volume control may not be shown.